

Tuesday, 30 April 2013
Cafe Culture
Bumped into these lovely ladies in Society Cafe today. In fact, everyone seemed to be there - which was typical seeing as I had no make up on, and had gone to do some quiet revision away from my house! That's Bath for you. But sometimes it's good to be around people and bounce off each other's energy.
Monday, 29 April 2013
Chocolate and Beetroot Brownies
Some very bad food things happened to me today. Bad things like a can of Red Bull, a LOT of carbs, and two helpings of these impossible-to-resist brownies. But in my defense the Red Bull was a very necessary study aid, the pasta was served with a whole heap of spinach, and these brownies have beetroot in them. So they're kind of healthy. Kiiiiiind of.
That's right, I snuck beetroot into my brownies. And nobody died. In fact, they were fantastic.

If you get your kicks tricking your kids into eating veg, you'll go crazy for this. If you're a bit of a prankster you might like to give them to someone who claims to hate beetroot - they have a very subtle beetroot flavour, but mostly it just adds moisture and a fruity kind of sweetness. Or maybe you're just a fan of gooey brownies with a crunchy topping (and frankly if you're not, you're no friend of mine), either way these are a must try. Although I think in this case, tasting is believing.
The recipe is from the lovely folk at River Cottage, so I can't take the credit for it unfortunately, but I do suggest you give it a go.
250g unsalted butter, cut into cubes
250g dark chocolate (70% cocoa solids), broken into pieces
3 medium eggs
250g caster sugar
A pinch of sea salt
150g self-raising flour
250g beetroot, boiled until tender, cooled, peeled and grated
Two things here: Hugh suggests using wholemeal self-raising flour. I felt this was a little ridiculous considering I was already putting a vegetable in my brownie, but feel free to try it and let me know how that works out. He also seems to think I'm going to buy fresh beetroot, boil it, peel it AND grate it, when there are perfectly good packs of cooked beetroot on the supermarket shelves. If I was eating it fresh in a salad then maybe, but not when it's about to be smothered in chocolate. Save yourself some drama and buy the vacuum packed version, just for god's sake make sure it's not pickled.

Grease a baking tin, approximately 20cm x 25cm, and line the base with baking parchment.
Put the butter and chocolate in a heatproof bowl. Set the oven at 180°C/Gas Mark 4 and - get this! - put the bowl in it for a few minutes until the chocolate and butter start to melt. Stir, then put back into the oven for a few more minutes to melt completely. I love this idea! You can of course heat it in a bowl over a pan of simmering water, but Hugh and his eco-warrior pals recommend taking advantage of the warming oven. This worked really well so is definitely something I'll be trying again.
Whisk the eggs and sugar together in a large bowl until combined, then beat in the melted chocolate and butter until smooth. Combine the salt with the flour, sift them over the chocolate mixture, then gently fold in with a large metal spoon.
Fold in the grated beetroot - be careful not to over-mix or the brownies may come out tough.
Pour the mixture into the prepared tin and smooth the top with a spatula.
Bake for 20-25 minutes - when the brownies are done, a skewer inserted in the centre should come out with a few moist crumbs clinging to it. Mine actually took more like 30-35 minutes, but make sure you check on them and DON'T be tempted to overcook them, as they'll firm up during the cooling process.
There are few things in life more disappointing than a dry brownie.
Remove the tin from the oven and leave on a wire rack to cool before cutting into squares.


Incidentally, they make a great study aid too!
Miss P x
Sunday, 28 April 2013
Eggs Florentine
Perfect Sunday breakfast - minus the hollandaise because we're trying to be good, right? Right.


Friday, 26 April 2013


Thursday, 25 April 2013

Wednesday, 24 April 2013
Banana Peanut Butter Oat Smoothie

Today has started well. I came up with this great smoothie for me and the Little One, and it's a good feeling knowing he's gone to school with a belly full of banana and oats.Try it if you need an energy boost, or as a lighter breakfast option. It's delicious! For two glasses, whizz together in a blender:
2 bananas
400ml natural fat free yoghurt
2 tbsp porridge oats
1/2 tbsp natural peanut butter (smooth or crunchy)
1 tsp honey
a glug of orange juice
Add a little orange juice at first, then however much you need to reach the desired consistency, blending after each addition.
I enjoyed mine whilst staring blankly at my laptop, contemplating the vast amount of work I have to do. So then I did some Pilates, had a shower, and am now writing this blog post. I need to stop distracting myself and get back to my desk, basically.

Tuesday, 23 April 2013
Dongpo Pork Belly
I recently bought some slices of pork belly, with the idea that I'd attempt to cook a version of this amazing pork belly dish we have in our favourite Chinese restaurant, Hoi Faan. Of course I couldn't for the life of me remember the name of it, so after browsing an embarrassing number of pork recipes on Pinterest, I came across this recipe for Dongpo Pork.

The chunks of pork belly are braised slowly in a sweet and sticky soy sauce marinade, which is then reduced to a thick glaze. I think I got a little impatient though, so our sauce was not as thick as it perhaps could have been - although a little more flour than the recipe states could have solved that issue.
I served mine on top of some garlic pak choi, alongside fluffy white rice.
Oh, and one more thing - IT HAS GIN IN IT. Gin and pork! What's not to love?
If that seems an unlikely union, you can use the more conventional rice wine. But I couldn't get hold of any, and if Wikipedia tells me that gin is a good substitute, then who am I to argue? You can also use sherry, apparently. But you probably don't have that in the house. Unless you are my Nan.
The recipe is from the adorably named blog 'Kitchen of Friends'. Click HERE to go the full recipe, which has much more instructional pictures than I have managed to give you.
That's honest blogging right there.

Monday, 22 April 2013
The Real Italian Ice Cream Co.
.jpeg)

Hands down, the best place to get an ice cream in Bath - because there's nothing better than a bit of proper gelato on a sunny Saturday. We had a pretty loved-up weekend full of good food, sunshine, drinks, long walks and movies. Which all seems like a far away dream now that I'm faced with a week of revision for my end of year exams...*sigh*.
Thursday, 18 April 2013
Feta and Courgette Fritters

Ahh, proof that fried things can be kind of healthy!
These fritters contain wholemeal flour for extra nutrition, but you can use all white flour if you prefer - the resulting fritter will be a little lighter in texture, so it may be worth the nutritional sacrifice.
I made about 12 fritters but they were quite large, so you may get more like 16 if you're a little less generous with your portions. I've adapted various other recipes to make this one, taking my favourite aspects of each.
3-4 courgettes (approx 600g), coarsely grated
60g self raising flour
40g strong wholemeal flour
2 eggs, beaten
3 spring onions, chopped
150g feta cheese, crumbled
1 garlic clove, finely chopped
1 tsp paprika
zest of 1/2 lemon
2 tbsp dill, if you have it
olive oil for frying
To make the fritters:
Put the grated courgette into a large mixing bowl and sprinkle with salt. Leave for 10 mins. Drain off any liquid that has left the vegetables, then transfer them onto a clean tea towel to squeeze out any more liquid. This step is important - no-one likes a soggy fritter.
Put the courgette back in the bowl, add the flour and eggs and mix well. Now add the spring onions, feta, garlic, herbs, paprika, lemon zest and seasoning (go easy on the salt as you have already salted the courgettes).
Mix once more.
Heat the oil in a frying pan over a medium heat.
Carefully drop spoonfuls of batter into the oil, using approx 2 tbsp batter for each fritter. Pat each one down slightly so they flatten in the pan.
Fry gently for about 3 minutes each side, until golden brown.
Drain on kitchen paper and keep warm in a low oven.
Repeat the process until all the batter has been used.
I served mined with a side salad with some chilli jam alongside. They would be great as part of a mezze dinner with perhaps some houmous and falafel, or as finger food with drinks. Or even cold for a picnic lunch.
Or even for breakfast. No? I went too far.
Wednesday, 17 April 2013


This might be an overshare. In fact, yeah it definitely is.
Anyway, this morning I was diagnosed with gastroenteritis, caused by stress - must be that bad habit of mine of always leaving my essays until the last minute. My body is clearly trying to tell me to look after myself. So I'm looking for any useful tips on foods that aid and improve the digestive system, or that have particular gut healing qualities. Activia doesn't count, I already know about that!
I'm starting with big mugfuls of natural ginger and lemon tea, and a load of vegetables and wholegrains. And some flowers to cheer myself up.
Monday, 15 April 2013
Spicy Lentil and Coconut Soup
I have to share my new obsession with you: pure Organic Coconut Oil.
I bought a big jar of the stuff after reading about its many benefits as a beauty product, so wanted to try it out on my skin and hair. I have to say that my son and I often suffer from dry skin and eczema, and have been recommended various creams from doctors and pharmacists in the past, which often contain nasty steroids and chemicals. Well none of them have been as effective as this! OK I know it sounds a bit like I'm sponsored by coconuts here, but it's true! What I wasn't entirely aware of when I bought my first jar, is the range of health benefits it has also has when you eat or cook with it.
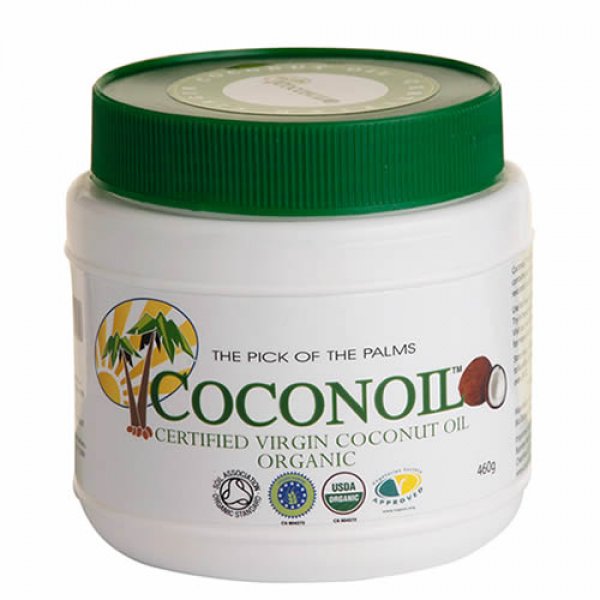
Coconut oil is fast gaining popularity - Gwyneth Paltrow smothers herself in the stuff; Jennifer Aniston was recently seen with a shopping trolley full of it; Angelina Jolie eats spoonfuls for breakfast; and Miranda Kerr calls it her "beauty secret", consuming four tablespoons a day on salads, in her cooking, and stirring it into her green tea.
Once dismissed by the World Health Organisation as unhealthy due to its high levels of saturated fat, scientists have now proved that it's not the same as saturated fats found in vegetable oils, and its natural fats are in fact good for the heart as well as cholesterol levels. Mostly this was evident when they studied inhabitants of the South Pacific, whose diet is largely based on coconuts and coconut oil, but among whom heart disease is virtually non-existent. It can also aid and improve the digestive system, preventing various stomach and digestion related problems, including IBS. AND it helps in the body's absorption of other nutrients such as vitamins, minerals and amino acids. AND it's been proven to aid weight loss.
OH and it gets rid of those little bumps you sometimes get on the backs of your arms. There's a name for that isn't there? You'll have to look that up yourself. I've done enough Googling today.
But frankly though, I'd eat pretty much anything that Miss Kerr called her beauty secret, wouldn't you?

Top tip: you may want to buy two jars and keep one on the kitchen, and one in the bathroom. Or seperate the contents of one jar. Basically find a hygienic way to not be cooking with the oil you've just double dipped when spreading onto your bumpy arms. OK?
So I've decided to start using coconut oil in my cooking wherever possible, especially if the dish actually requires a coconut taste. The taste is subtle, however, so I will try it in others also.

Spicy Lentil and Coconut Soup
(4 portions)
1 heaped tsp organic coconut oil
1 medium onion, finely chopped
2 cloves of garlic, minced
200g red lentils, rinsed
2 tsp garam masala
2 tsp cumin seeds
ground chilli flakes
1 litre organic vegetable stock
250ml carton coconut cream
1. Heat the coconut oil in a large saucepan, over a medium heat.
2. Add the onion and garlic, reduce the heat and soften slowly and gently for 8-10 minutes. Be patient - slower cooking will release the sweetness of the onion, adding a depth of flavour to your soup.
3. Now add the spices and stir for less than a minute. before adding the lentils. Stir well to coat the lentils in all the flavours. It will smell great at this point!
4. Pour in 750ml of the vegetable stock, bring it up to the boil, then reduce the heat and leave to simmer for 10-12 minutes, until the lentils are soft. Check halfway through as you may need to add a little more liquid.
5. Empty the contents of the coconut cream into a separate bowl, as it will have split into solid cream and watery liquid. Add half of the cream to the soup and a little of the coconut water.
6. Turn off the heat, and leave to cool a little before blitzing in the pan with a hand held blender.
7. Depending on the consistency that you like your soup, stir in a little more stock until you get it just right.
Do you have any great ideas for using coconut oil? I'd love to know!
Sunday, 14 April 2013
A Good Sunday


The Little One had to hang out with me and the girls today, but of course he loved the attention. We had a good catch up over brunch at Boston Tea Party (I forgot how good their bacon is!) followed by a browse around the Artisan Market, and then a play - and photo shoot - in the park. A perfectly chilled Sunday.
Sunday, 7 April 2013
Fresh
Is there any better start to a new week than a fridge full of food and a fresh, healthy attitude? With Summer on the horizon Miss P's Kitchen is going to be a virtuous place. There will still be the odd cake here and there, but mostly there'll be a focus on doing our bodies GOOD. Are you with me?

Saturday, 6 April 2013
Miss P Does Paris, Volume II


I have been pining for Paris. Or maybe just travel generally. So I was browsing through photos from our trip last Autumn and realised that I still hadn't shared some of them with you...
View from our hotel; A local patisserie; Riding the Metro; Oyster bars and flea market shopping in Le Marais district; beautiful macaroons from Ladurée (salted caramel or raspberry were the best); A cold morning walk around the Eiffel tower.
I think we need to make a return visit this year...
Swedish Summer Cake

The sun has arrived and it feels like we can finally start talking about the Summer!
This ENORMOUS traditional Swedish Summer cake was made by only Swedish friend (so I'll have to take her word for it), the beautiful Rene Humphrey. Click the link to go to her inspirational lifestyle blog.
It consists of layers of thin sponge, each spread with fresh whipped cream mixed with crushed strawberries, then built into layers. Then it's stopped with more cream and strawberries - the end result is a light cake bursting with the fresh taste of Summer. I will definitely be trying to make this myself this year, so I'll be sure to get the recipe from her and share it with you all.
Hope you're all enjoying the sunshine! x
Wednesday, 3 April 2013
Spring Yellows and Some Cheesy Eggs


Cheesy Eggs are a big happening thing in our house, with the Little One boldly declaring that they were his "new favourite kind of egg".
To make one portion: heat the oven to 180°C. Crack 2 eggs into a ceramic ramekin (I use my adorable pink Le Creuset set but that is definitely not essential). Season. You can at this point add a little creme fraiche if you have it, to lighten the finished dish. Or, just go ahead and pile on some grated cheddar. Place in a bain-marie, which to you and I is a baking dish filled halfway with boiling water. Now cook in the oven for 15-20 minutes. You will nee to check on them, possible even after 12 minutes, to check that the yolks haven't set. You are looking for a smoothly set white with a satisfyingly oozy yolk. This actually took 20 minutes in my oven, but ovens do vary and eggs are temperamental little things.
Make some toast soldiers or cut up some fresh crusty bread to dip into the eggy cheesy goodness. This would also be nice with some asparagus and ham alongside, for an effortlessly fancy brunch.
Et voila! Cheesy Eggs. Your new favourite kind of egg, apparently.
Subscribe to:
Posts (Atom)